Can You Upload a Background to Sweet Home 3d
Sweetness Abode 3D user's guide
Introduction
Installation
User interface
Starting a new home
Importing home pattern
Drawing walls
Editing walls
Adding doors, windows and article of furniture
Importing 3D models
Drawing rooms
Adding levels
Editing 3D view
Other features
 Introduction
Sweetness Home 3D is a free interior design awarding that helps you lot place your furniture on a house 2d programme, with a 3D preview.
Available at https://www.sweethome3d.com/, this program is aimed at people who want to blueprint their interior quickly, whether they are moving or they just want to redesign their existing home. Numerous visual guides assistance you depict the plan of your home and layout furniture. Yous may draw the walls of your rooms upon the image of an existing plan, and and so, elevate and drop furniture onto the plan from a catalog organized by categories. Each change in the 2nd programme is simultaneously updated in the 3D view, to show you lot a realistic rendering of your layout.
This guide shows you lot how to create a habitation with Sweet Home 3D version 6.6. After describing its user interface, you'll learn how to draw the walls of your home, and how to layout the furniture. The example created in this tutorial is available at https://world wide web.sweethome3d.com/examples/userGuideExample.sh3d (iii.2 MB).
For more than information, you may also view Sweet Home 3D video tutorials, use Sweet Home 3D help attainable from the Help push button found in the tool bar of Sweetness Habitation 3D windows, and larn more advanced tips.
figure 1. Sweetness Home 3D help

Installation
Sugariness Dwelling 3D may be run on Windows, Mac OS X 10.4 to macOS 12, Linux and Solaris, and is translated in 29 unlike languages.
Depending on your organisation, use the following instructions to download Sweet Home 3D and install it:Yous may also edit your homes with Sugariness Domicile 3D Online. The features of this version are similar to the ones of the downloadable version except that your homes will be automatically saved on the server of this web site once you lot registered. The Online version doesn't have any menu bar, merely all the menu items of the downloadable version are reachable from its contextual menus or the tool bar, except 3D models importation, as well as photos and videos creation.
User interface
Each Sugariness Home 3D window edits the interior design of a home and is divided in 4 resizable panes, with a tool bar at its peak, equally shown in effigy 2.
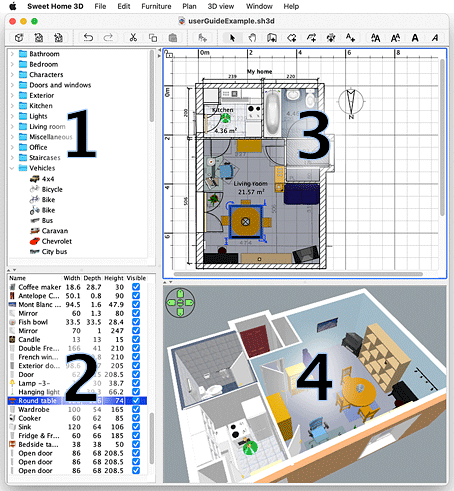
figure 2. Sweet Home 3D panes
1 The furniture catalog
This catalog, organized by categories, contains all the furniture and objects you may add to your home design. Y'all can display the article of furniture of a category by clicking on the triangle beside its name.3 The domicile programme
This pane displays your home as seen from top, upon a filigree and surrounded by rules. You draw the walls of your home with the mouse in this pane and layout your furniture upon it.
2 The home furniture listing
This list contains the furniture of your home, where their proper noun, size and other characteristics may be displayed. Information technology may be sorted past clicking on each column title.iv The home 3D view
This pane displays your home in 3 dimensions. You may meet your home in this pane either from the top, or from a virtual visitor point of view.
Each pane may have the focus (i.e. receive keyboard input), and some operations depend on the focused pane, recognizable by the colored rectangle that surrounds it ; for example, the abode plan has focus in figure ii. To transfer focus to some other pane, use Tab and Shift + Tab keys, or click in the pane that should gain focus.
All modifications done in the abode programme are undoable/redoable by clicking on the Undo and Redo buttons in the tool bar. Don't hesitate to try the diverse operations proposed by the program.

Starting a new habitation
Earlier proceeding farther, display the preferences dialog box as shown in figure 3, with Sweet Home 3D > Preferences... carte item under Mac OS 10 or File > Preferences... menu item under other systems. Check the default unit of measurement used in the program, the default thickness and height of walls, and other preferences.
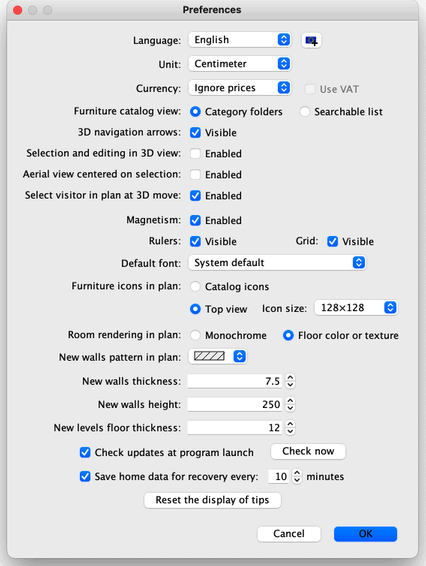
figure iii. Editing preferences
To create a home, simply use the default home created at Sweet Home 3D launch or click on the New home push button in the tool bar.
The suggested steps of a home design in Sweet Domicile 3D are:
- Import the scanned blueprint of your dwelling house as a background epitome of the home plan,
- Draw walls upon this groundwork image,
- Edit walls thickness, colors and textures,
- Add doors and windows to your home programme and adjust their size, to obtain a realistic view of your empty home,
- Add together piece of furniture to your home programme, conform their size and location, eventually using imported 3D models,
- Describe rooms and modify the colour or the texture of their floor and their ceiling,
- If your home has more than one story, add together levels and staircases joining them, and restart the first six steps for each level,
- Draw dimensions and add together texts in your dwelling house plan to certificate it before printing it.
During these steps, you'll probably navigate in 3D view ofttimes to modify the point of view on your layout.
By the manner, don't forget to regularly save your projection by clicking on the Salvage home button (except with the Online version where the edited home is automatically saved). A Sweet Home 3D file may exist exchanged with other users and may comprise imported 3D models not present in the default catalog.
Yous may also create images of the 3D view at PNG format, compute 3D videos from a virtual path in your home and consign the 3D view of your home at OBJ + MTL format.


Importing home blueprint
This first step is non mandatory but it speeds up the drawing of the walls of an existing home. And so endeavor to find the blueprint of your dwelling and scan information technology if you didn't practice it yet, ensuring the image is correctly rotated. Don't import a large file in Sweet Habitation 3D, this prototype is supposed to be a helper, not some art!
Choose Program > Import background image... menu to display the magician that helps you to choose and scale an image file, as shown in figure 4.
1
Click on Choose image and choose your prototype in the file dialog box. Sugariness Home 3D supports BMP, JPEG, GIF or PNG formats. The scanned image used in this tutorial is available at https://www.sweethome3d.com/examples/userGuideBluePrint.jpg
2
Once the image is loaded, click on Keep.
three
Define the scale of the image by moving the end points of the colored line drawn in the image, in such a way that this line matches a known length. So blazon the real length of this line in the Length of the drawn line field, and click on Continue.
4
Define the origin of the image in the programme, i.east. the indicate in the image matching the point (0, 0) in the home program. So click on Finish.
Once the wizard is airtight, your image will appear backside the dwelling plan grid at the chosen calibration, as shown in figure 5. If you chose a wrong scale or location, edit them by choosing Plan > Alter groundwork image... out of the menu.
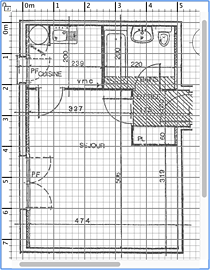
figure five. Groundwork image in the home plan pane
Cartoon walls
To describe walls, click get-go on the Create walls push button in the tool bar.
Click in the home plan at the start point of the new wall, then click or double-click in the programme at its end point. Equally long as you lot don't double-click or press the Escape cardinal, each new click indicates the opposite point of the current wall and the start indicate of the side by side wall.
To help you draw walls precisely, use walls tooltip, alignment lines and modify the plan calibration with Zoom buttons. You lot may also enter the length and the angle of the wall beingness created after pressing the enter key.
Don't take doors and windows into account while drawing walls, because Sweet Home 3D will automatically compute the holes in the walls where you lot will place openings. Every bit shown in figure 6, walls are simultaneously fatigued in the plan and in the 3D view, and yous tin adjust the point of view in the 3D view at any time, by moving the mouse with its left button pressed.
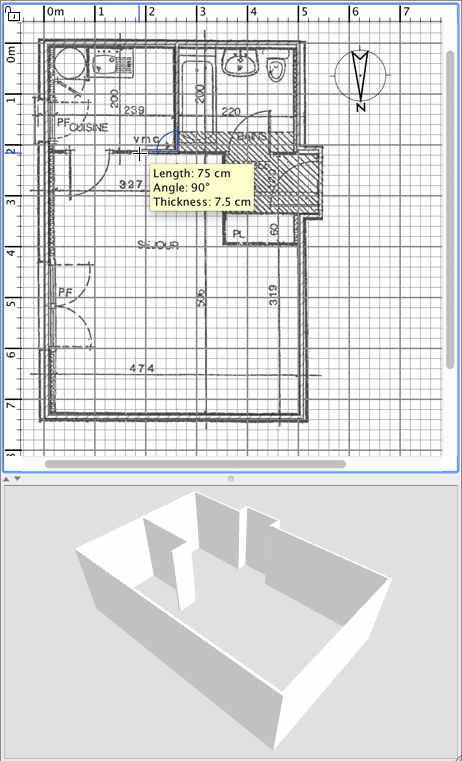
figure half dozen. Drawing walls
To help y'all drawing parallel walls, the angle of the walls on the floor is a multiple of xv° by default. Y'all may abolish this magnetism by disabling magnetism in the preferences dialog box or by holding the Alt primal pressed during the drawing under Windows, the cmd fundamental nether Mac OS 10 or the Shift + Alt keys under Linux.


Editing walls
Click on Select push in the tool bar, to terminate the cartoon of walls and employ tools disabled during the drawing of walls.
When Select fashion is chosen, you tin can select one object in your home plan by clicking on it. You can as well select ane or more objects by drawing a choice rectangle effectually them, or clicking on each of them while pressing Shift key.To motion selected walls (and other objects) in the domicile plan, but drag and drib them, or utilize keyboard arrow keys. When i wall is selected in the programme, you can besides movement its start and end point with the mouse or dissever it in 2 walls with Programme > Carve up wall menu item.
Double-click on a wall or choose Plan > Alter walls... from the menu to modify the current fix of selected walls with the wall dialog box.
As shown on effigy 7, this dialog box helps yous to edit the colors or the textures of left and correct sides of the selected walls, and their thickness and their height. If you want to utilise an image of your own as a texture, click on the Import button and employ the texture import sorcerer that will guide yous.
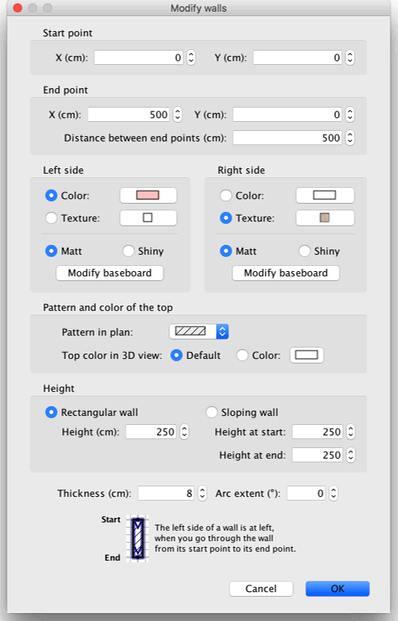
figure 7. Editing wall attributes

Calculation doors, windows and article of furniture
To add article of furniture to your abode, elevate and drop piece of furniture from catalog to the home program or piece of furniture listing, equally shown on figure eight, or select a piece in the itemize and click on the Add furniture push in the tool bar.
The pieces added to the domicile are selected and drawn simultaneously in the piece of furniture list, in the dwelling house plan and in the 3D view.
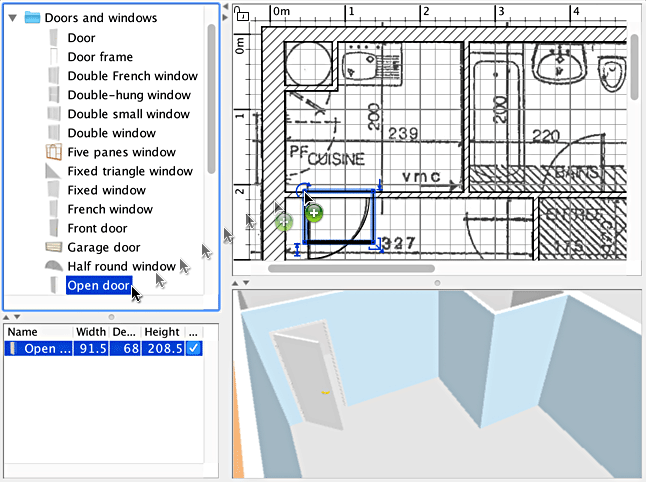
effigy viii. Calculation doors, windows and piece of furniture to the home planOffset add together doors and windows to your home program to get a realistic view of your empty home. When magnestism is active, a door or a window dropped upon a wall is automatically oriented and resized depending on the orientation and the thickness of that wall.
Then add furniture and adjust their location, angle and size. When magnestism is active, a piece of furniture is automatically rotated then its back face lies along the wall upon which yous released the mouse cursor, and a piece dropped on a larger one will be elevated to appear on the top of the latter, if its default elevation is at floor level.When i piece is selected in the programme, yous tin can change its size, elevation or bending with one of the four indicators that appear at each corner of the selected piece, every bit shown in figure nine.
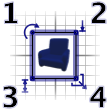
figure 9. Indicators of a selected piece of furniture
i The rotation indicator shows the corner you tin drag to rotate the selected piece. Concur Alt key to toggle the 15° magnetism applied during rotation.
3 The tiptop indicator shows the corner you tin drag to change the elevation of the selected slice.
2 The elevation indicator shows the corner y'all tin can drag to modify the meridian from the floor of the selected piece.
4 The size indicator shows the corner yous tin drag to alter the width and the depth of the selected piece. You may also double-click on a slice of article of furniture or choose Piece of furniture > Modify... from the carte du jour to modify the current set of selected pieces with the furniture dialog box. Equally shown on figure x, this dialog box helps yous edit the name of the selected furniture, its rotation angle, its location, its elevation from the floor, its size, its color or its texture, its visibility and whether its 3D model shape should be mirrored. If the selected objects contain 1 or more lights, this dialog box will let you also edit their power, but this will have an effect only at the 2 best quality levels in the photo creation pane.
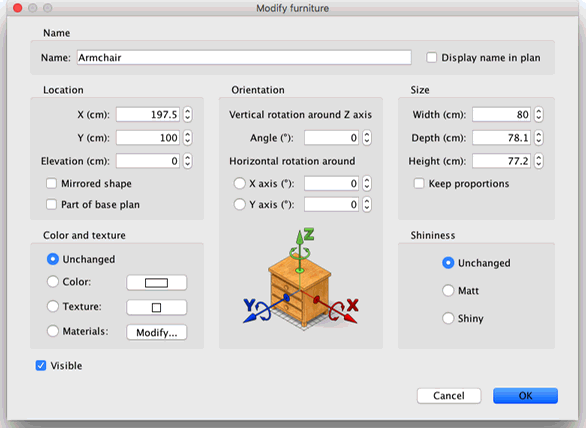
figure ten. Editing piece of furniture attributes
Invisible furniture isn't drawn in the habitation plan and 3D view, but it will withal announced in the furniture list to let yous make it visible once again later on.

Importing 3D models
If a piece of furniture or an object is missing in the itemize of Sweet Home 3D, yous may import a 3D model file, and use it in your home (characteristic not bachelor in Online version). More than 1400 gratis models designed by contributors may be downloaded at https://world wide web.sweethome3d.com/freeModels.jsp, but you can besides download models from other web sites, or create your own models with software similar Blender or Art of Illusion. Sweet Dwelling 3D supports 3D model files at OBJ, DAE, 3DS format, Null files containing a file of this blazon, and KMZ files.
Select Furniture > Import furniture... menu particular to launch the wizard that volition help you to choose and size the 3D model file, as shown in figure 11. Under Windows and Mac OS X, you may also drag and driblet a 3D model file in a Sweet Home 3D window to launch this wizard.
one
Click on Choose model and cull the 3D model file in the file dialog box. If you dragged and dropped in a window the 3D model file you want to import, it's automatically selected. Once the model is loaded, click on Continue.
2
Orientate the model with arrow buttons in such a way the front view displays the front end confront of the 3D model, and click on Continue.
3
Change if necessary the name, the size, the summit, the colour of the imported model and whether this model is movable, is a door, a window or a staircase. And then click on Continue.
4
Plow the 3D model with the mouse to get the best bespeak of view on the model for the model icon displayed in the furniture itemize, furniture list and home plan. And so click on Finish.
Once the furniture import wizard is closed, the imported model will appear in the piece of furniture catalog and/or dwelling plan and piece of furniture list, depending on the options you lot chose. You may use information technology as whatsoever 3D model of the default catalog.
Drawing rooms
To draw rooms, click kickoff on the Create rooms button.
Create a new room or a new surface in home plan using either way:
- click at each corner of the room, and then double-click at its terminal point or press the Escape cardinal after yous added the last point,
- double-click anywhere inside an existing closed surface (i.east. surrounded by walls), equally shown in figure 12.

figure 12. Creating with a double-click
a room that includes an half doorstep
Commencement draw walls and add together doors, before drawing rooms. Using this method, you'll be able to create rooms much faster by double-clicking in each surface that matches a room of your home. Note also that a room created with a double click will include the half doorstep of each door placed on its walls. This feature ensures rooms join each other correctly in the 3D view when the doors between rooms are opened.
Once yous a room is created, yous may modify its name, the color or the texture of its floor and its ceiling, by choosing Plan > Modify rooms... out of the menu, as shown on effigy 13.
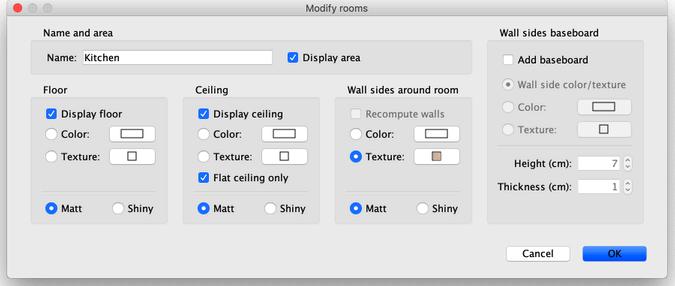
figure 13. Editing room attributesWhen one room is selected, you may also move each one of its points with the mouse in Select mode, and change the location of its surface area and of its name with the indicators drawn under texts.

Adding levels
If your home has more i level or story, y'all can create the boosted levels past choosing Plan > Add level from the menu or by clicking on the + tab that appears when a home has more one level. Each level is represented past a tab displayed at the top of the program view and used to select the level into which new walls, furniture and other objects will be added.
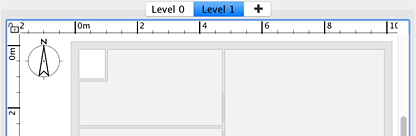
figure 14. New level showing in lite colour walls and ceilings of the lower levelAs shown in figure 14, walls and ceilings of the lower level are displayed with a calorie-free color in the plan view to help you employ wall or room cartoon tools more hands. If needed you may also re-create / paste some objects from an other level to the selected level.
The default elevation, height and flooring thickness of each level can be modified by double-clicking on its tab or by choosing Program > Modify level... out of the menu.
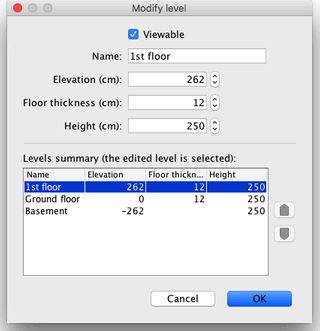
figure 15. Editing level attributesAs shown on figure 15, the level modification pane shows besides a table describing all the levels of a home to help y'all choose the correct values compared to other levels. To create underground levels, enter a negative elevation. The level acme is used to compute the elevation of the ceilings of the edited level.
Editing 3D view
At any fourth dimension during the drawing of your home, y'all can modify the point of view used in the 3D view. 2 dissimilar way of viewing the dwelling are available, the default selected mode set with 3D view > Aerial view carte and the other mode set with 3D view > Virtual visit. In both modes, y'all can use the mouse or keyboard arrows to alter the current point of view, every bit shown as in figures xvi and 17.
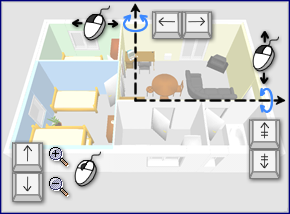
effigy 16. Mouse and keyboard actions in aerial view way
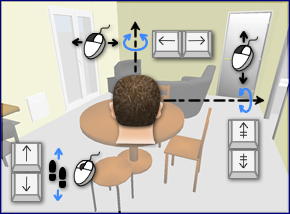
figure 17. Mouse and keyboard deportment in virtual visit manner
When Virtual visit fashion is selected, a virtual visitor seen from tiptop is likewise fatigued in the home programme. Its location and its angle is updated simultaneously in the program and 3D view with each movement of the visitor. This virtual visitor is surrounded by 4 indicators, as shown in figure 18.

effigy 18. Indicators of the virtual company
one
The caput angle indicator shows the angle yous can change to move the visitor'southward caput up or down.
2
The field of view indicator shows the angle that is currently viewed in the 3D view.
3
The body bending indicator shows the angle you tin can change to movement the visitor'south body to the left or to the right.
4
The optics elevation indicator shows the bespeak you can drag to motility upward or down the company's point of view.
You tin can likewise choose the 3D view > Modify 3D view... from the carte to change the color or texture of the footing and the sky, the low-cal brightness and wall transparency, every bit shown in effigy 19.
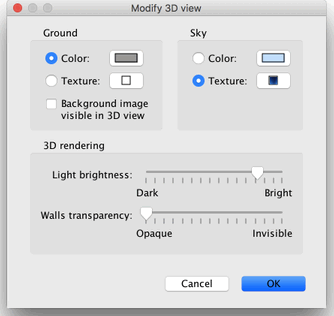
figure 19. Editing 3D view attributesAfter changing ground and sky colors, figure 20 shows ii 3D view screen shots of the dwelling house designed in this tutorial.
Other features
Drawing dimensions
To draw dimensions, click offset on the Create dimensions push button.
You can create a new dimension in the program using either way:
- Click at the start point of the new dimension, click at its end point, then click a tertiary time after moving the mouse pointer to choose the size of the extension lines drawn at each end of the dimension line.
- Move the mouse pointer on the edge of a piece of furniture, the wall side or the room side yous want to measure, double-click to accept the temporary dimension draw in the plan, and then click a tertiary time afterwards choosing the size of its extension lines.
In both cases, the new dimension won't accept whatever extension line if you don't move the mouse between the second and the third click.
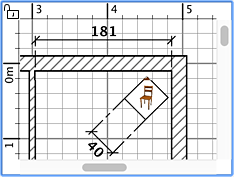
figure 21. Drawing dimensionsCalculation texts
To add free texts in plan, click start on the Add texts button.
Click at the location where you want to add a text in the home plan, and enter its text in the dialog box that will appear.
figure 22. A free text with bold style
At whatever time, you may change the size and the fashion of the selected texts with the text way buttons.
Impress
Once you designed your dwelling house, you can print it with File > Print... or File > Print to PDF... menus, and preview the result with File > Print preview... menu. By default, Sweet Domicile 3D prints the piece of furniture listing, the plan and the current 3D view of home, using default paper size, margins and orientation.
Choose File > Page setup... from the menu to modify this default option (characteristic not available in Online version), as well as the scale of the printed plan, the header and the footer, as shown in effigy 23.

figure 23. Page setupCreating photos of the 3D view
Click on the Create photograph... tool to create an image of the 3D view with the size and the proportions of your choice, and save information technology in a file at PNG format (feature not available in Online version).
Equally shown in figure 24, the pane used to create photos lets yous choose also the quality level of the created epitome. With a fast quality level, the created image will look every bit in the 3D view, whereas with the best quality level, the image will be more than photorealistic. At the two best quality levels, you may manage the illumination of the image by adding lights at a different power level or by changing the hour.

figure 24. Creating photograph
Computing an image at the best quality level may have a very long time depending of your home and the ability of your estimator. Still, note that you tin notwithstanding alter your dwelling house during this calculus. For technical reasons, only one Create photo pane may be opened at the same time.
Creating 3D videos
Click on the Create video... tool to brandish the pane used to create a video from a virtual path in the 3D view (feature not available in Online version). As effigy 25 shows, this pane lets y'all choose the format of the video and its quality in a manner similar to the photo creation pane.
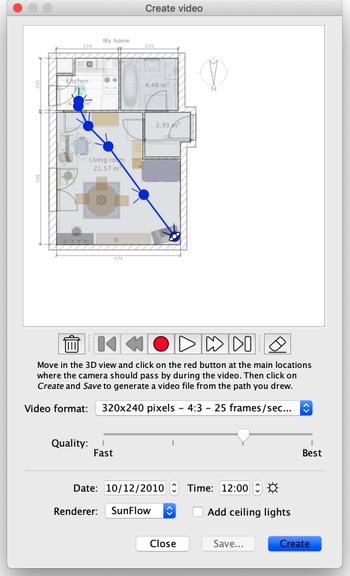
figure 25. Creating videoTo create a video, choose in the 3D view the initial location of the video camera and click on the red button in the video cosmos pane. Then move in the 3D view to the next location of the video camera and click once again on the carmine button. Repeat these steps for each location where the photographic camera should pass by during the video.
Each time you click on the red button, a new signal is added in the video cosmos pane to prove y'all the path of the camera. As Sweet Home 3D takes also into business relationship the vertical elevation of the camera, its ii rotation angles and its field of view, you may create all kind of animations.
Once the path you created is satisfying, click on the Create button to start the calculating of the video frames, and so once this computing is finished, click on the Relieve... button to salve the video in a Quicktime file. Y'all may view this video with differents tools like VLC or transcode it in an other format. Figures 26 and 27 evidence two videos computed from the path shown in figure 25 and transcoded to MPEG-4 format:
figure 26. Video with the same quality equally 3D view
figure 27. Video at the best quality
Utilise playback buttons to check roughly the path of the camera in the 3D view, considering computing a video may take minutes to hours depending on your habitation, the quality you chose and the power of your figurer.
Export to OBJ format
If you lot want to reuse your home in 3D software like Blender or Art of Illusion to improve its rendering for instance, choose 3D view > Export to OBJ format... from the menu and import the generated OBJ file in these software (feature not available in Online version). This bill of fare particular will write in the selected OBJ file the description of all the objects displayed in the 3D view, it will create a MTL file describing their color and finally, it volition salvage the images of the textures, y'all may have used. The effigy 28 shows a rendering done in Blender once a few lights were added in the scene.
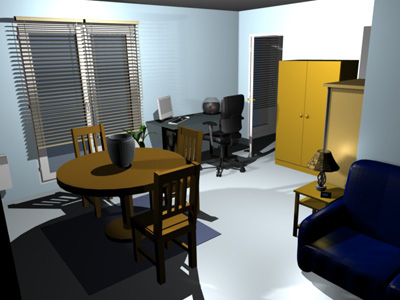
figure 28. Rendering of an exported home in BlenderAdding plug-ins
The features of Sugariness Home 3D may exist extended thanks to plug-ins, that you may even develop yourself if you're able to plan in Java.
A plug-in is a SH3P file stored in the plug-ins folder of Sweet Dwelling house 3D. To install a SH3P file in this folder, only double-click on this file under Windows and Mac OS 10. Under Linux, yous'll have to re-create the SH3P file in the subfolder .eteks/sweethome3d/plugins of your user folder if the double-click doesn't work.
Once the plug-in is installed, relaunch Sweet Home 3D to let the new carte items and/or the new buttons matching the plug-in features appear. For example, the Dwelling rotator plug-in adds ii items to the Plan menu able to rotate all the items in the home programme clock wise or counter clock wise.To uninstall a plug-in, remove its SH3P file from the plug-ins folder of Sweet Home 3D, and restart the application. This folder is shown when you lot click on any SH3P file listed in the Plug-ins section of the Libraries in utilize pane. The latter pane is displayed by clicking on the Libraries... push button shown at the lesser of Sugariness Home 3D About dialog box.


Thanksto Pencilart for her contribution to the translation of this folio.
Terminal update : December 23, 2021
| | | |||||
| © Copyright 2006-2022 eTeks - All rights reserved | ||||||
Source: https://www.sweethome3d.com/userGuide.jsp
0 Response to "Can You Upload a Background to Sweet Home 3d"
Post a Comment